Reflow Soldering of SMT Boards
In order to reliably, and in some cases make it possible, to solder some surface mount parts and get efficiency gains when making small prototyping batches it may be useful to employ one of the space's reflow soldering ovens. Here follows one possible route to achieving this with tools found in the space and readily available materials.
Precautions
Solder paste is toxic and although you can't absorb lead through your skin, when it's in powder form or in suspension as with solder paste, it gets everywhere and isn't readily seen in small quantities. Lead-free solder paste is available which requires a different temperature profile - see later. Flux isn't particularly nice either, so handle paste carefully. Clean work areas from it, dispose of it properly and wash your hands afterward. Wear gloves and suitable workwear to cover your skin and `good' clothes with.
Materials required
- Chemicals
- Solder Paste
- (CHRONIC/ ACUTE HEALTH HAZARDS) Lead: Women of child-bearing age should avoid exposure to lead and its inorganic
compounds due to post-natal effects. Lead can cause potential injury to a developing fetus and possible effects on reproduction. Exposure to high levels of airborne or ingested lead may produce symptoms of anemia, weakness, constipation, nausea, and abdominal pain. Prolonged exposure may result in kidney and/or nervous system involvement.
- POTENTIAL HEALTH EFFECTS (CHRONIC and OVEREXPOSURE) Tin: Dust or fumes may cause irritation of the skin mucous membranes and may result in a benign Pneumoconiosis (Stannosis).
Silver: May cause discoloration of eyes and skin (Argyia). Bismuth: May cause foul breath, a blue-black line on the gums, and Stomatitis. Antimony: May cause gastrointestinal upset, sleeplessness, irritability, and muscular pain. Indium: May cause weight loss, pulmonary edema, blood damage and degenerative changes in liver and kidneys.
- General materials
- Gloves (put these on before starting to work with chemicals!)
- Flat board to tape everything down to
- Kapton or other tape
- Mylar (BoPET) sheet. Should also work with Kapton sheet - experimental results to follow.
- Surface mount parts for placement
- BOM or some list of which parts go where on the board
- Tools
- Laser cutter
- Tongue depressor, old loyalty card or paste squeegee if you have one
- Tweezers
- Reflow oven. There is currently one working one based on a commercially available controller module. The SoMakeIt open source oven controller will follow.
- Optionally: Magnification
- Optionally: Lighting
Note: You don't have to get these ready all at once, but it helps to make sure you know where everything is before getting started.
Cut the stencil
- Presumably you designed a PCB and if you didn't you hopefully have access to either the design files or suitable output for solder stencil.
- In KiCad do the following:
- Align the image output on an Inkscape document so it ought to be cut in your preferred location on your Mylar sheet.
- Send to the laser cutter.
- Experimentally, we have found that running the laser cutter in raster mode with 100% speed, 35% power and 5kHz modulation frequency to produce acceptable results on 62.5um Mylar. YMMV. Experimental input welcome.
- It's worth noting that rastering will cause the edges of the holes where material has been removed to become slightly raised. Bear in mind whether you want a bit of difficulty applying paste or really accurate paste placement when deciding which way up the raised material will end up relative to the board surface. Lightly sanding might help although I haven't tried myself.
 External view of SoMakeIt reflow oven 1
 Laser cut Mylar solder stencil
Prepare for part placement
- Gather the following items on a workbench:
- Gloves (put these on before starting to work with chemicals!)
- Tongue depressor, old loyalty card or paste squeegee if you have one
- Tweezers
- Solder Paste
- Stencil cut in the previous step
- Tape down your board with Kapton or other tape, ensuring the pads you wish to apply paste to are exposed.
- Trim your stencil down to approximately the size of the board. Identical size would be good but slightly smaller might work to avoid bending the edges and raising the stencil from flush with the board nearer the centre.
- Carefully align your stencil with the board and tape it down, again, avoiding the exposed pads.
- Apply a small amount of paste and distribute across the stencil ensuring even application to the pads below. The thickness of the stencil material will limit the amount and from experience it's easier to remove excess than add more later after the stencil is removed.
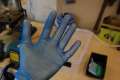 Wear gloves before all else.
 PCB attached to base board
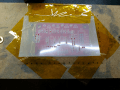 Attaching the stencil to the board. Part 1.
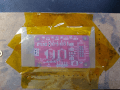 Attaching the stencil to the board. Part 2.
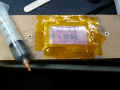 Applying solder paste
 Solder paste applied.
Place parts
- Gather the following items on a workbench:
- Tweezers
- Surface mount parts for placement
- BOM or some list of which parts go where on the board
- Optionally: Magnification
- Optionally: Lighting
- Pick parts up out of their packaging and place in their correct locations with tweezers or vacuum tool if you have one.
- External view of SoMakeIt reflow oven 1
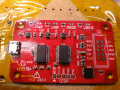 Parts placed on PCB ready for reflow.
 Surface mount parts placement
Bake!
- Very carefully transport your populated boards to the oven.
- For most even heat distribution on larger boards it may be a good idea to place a sheet of something metallic underneath the board to avoid the toaster grill sinking heat where the wire contacts the board.
- The oven has a simple user interface and pre-programmed profiles for lead and lead-free solder paste or else you can define your own.
- Press start and wait for about 5 minutes for initial pre-heat then another 5 minutes or so for the profile to cycle.
- SoMakeIt oven one doesn't cool down readily. Opening the door after the audible indication cools everything down at a rate closer to the profile definition.
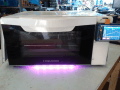 Reflow oven in action.
 Some finished boards.
Tidy up your setup
- Wipe away all solder paste residue from work area and stencils and dispose of other waste too.
- Tidy away tools.
- Return the reflow oven to its home.